

EUR
en
- es
- pt
- fr
- de
- it
Published on 2016-06-08
Now a day, the most well known brands that offer Android smartphones incorporates the most speaking languages in their devices. However, there are a few of those devices which don’t come with your local language incorporated (especially, those made for the Asian market).
The absence of the user's native language is therefore an obstacle at an interesting market in Europe. Those smartphones are new, unlocked and work perfectly fine in our country, like the Samsung Galaxy Note Edge, a model that is only manufactured for the Asian market and doesn’t integrate the Spanish tongue.
Fortunately for us, there is a way to resolve this issue! Thanks to: MoreLocale 2. A light application which allows us to integrate an other tongue at an Android terminal.
In order to make this application work on our new device, we have to execute a fast and easy manipulation. This operation is completely legal and does not annul our warranty rights.
The first thing to do, is to go to the Play Store, download and install MoreLocale 2 in our device. Once done, we need 3 things:
- A computer.
- A USB cable.
- Install Minimal installation of ADB and Fastboot in our computer.
Once reunited, we have to go find the menu “Setting” in our phone (symbolized by a nut) and look for the developer menu options. If it is not activated yet we should go to “About the device” or similar, then at “software info” or similar and enter the 6 “Build Number” or “Version Number” of our device. At this point, we should get a message telling us that the developer menu options has been activated.
Let’s go back to the menu “Setting” and look for the “Developer” or “Developer Mode”, in there let’s activate the “USB Debugging”.
Let's connect our phone to our PC and it will request us to authorize the "debugging" mode. We say "OK".
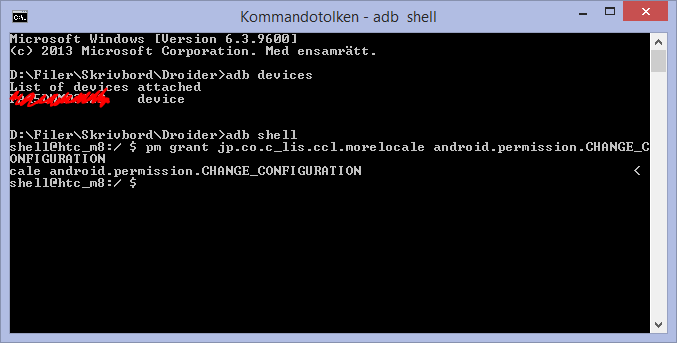
Let’s install “Minimal installation of ADB and Fastboot” in the computer and open the application. The system console should show up (black screen). There, let’s type the following writing below and press enter:
adb shell
This action will allow us to access the mode shell in our device and make it accept our commands.
The content in the system console should change and we should see left the word adb. Now, we have left to introduce (Watch out for the typing errors and uppercase letters) or copy paste the following content:
pm grant jp.co.c_lis.ccl.morelocale android.permission.CHANGE_CONFIGURATION
The system console should not change much, simply duplicate the last content introduced. It will mean that the process has worked properly. From now on, if we go to MoreLocale 2 and select the Spanish tongue we will find a device that has entirely changed language. Easy, isn’t it?


COMMENTS
No customer comments for the moment.